IT_World
[Deep learning]컨볼 루션 신경망에서 필터 및 기능 맵을 시각화하는 방법 -3- 본문
[Deep learning]컨볼 루션 신경망에서 필터 및 기능 맵을 시각화하는 방법 -3-
engine 2021. 4. 30. 11:06How to Visualize Filters and Feature Maps in Convolutional Neural Networks
Deep learning neural networks are generally opaque, meaning that although they can make useful and skillful predictions, it is not […]
machinelearningmastery.com
[Deep learning]컨볼 루션 신경망에서 필터 및 기능 맵을 시각화하는 방법 -2-
machinelearningmastery.com/how-to-visualize-filters-and-feature-maps-in-convolutional-neural-networks/ How to Visualize Filters and Feature Maps in Convolutional Neural Networks Deep learning neural..
niniit.tistory.com
지난번 포스팅에 이어 마지막으로 기능 맵을 시각화하는 방법을 살펴볼 것이다.
기능 맵이라고하는 활성화 맵은 입력 이미지 또는 다른 기능 맵과 같은 입력에 필터를 적용한 결과를 캡처한다.
특정 입력 이미지에 대한 특성 맵을 시각화하는 아이디어는 특성 맵에서 감지되거나 보존되는 입력 특성을 이해하는 것이다. 입력에 가까운 기능 맵은 작거나 세분화된 세부 사항을 감지하는 반면 모델 출력에 가까운 기능 맵은 보다 일반적인 기능을 캡처한다.
기능 맵의 시각화를 탐색하려면 활성화를 만드는 데 사용할 수있는 VGG16 모델에 대한 입력이 필요하다.
예제를 실행하면 모델 요약에서 본 것과 동일한 출력 모양이 표시되지만이 경우에는 컨벌루션 레이어에만 해당된다.
# summarize feature map size for each conv layer
from tensorflow.keras.applications.vgg16 import VGG16
from matplotlib import pyplot
# load the model
model = VGG16()
# summarize feature map shapes
for i in range(len(model.layers)):
	layer = model.layers[i]
	# check for convolutional layer
	if 'conv' not in layer.name:
		continue
	# summarize output shape
	print(i, layer.name, layer.output.shape)
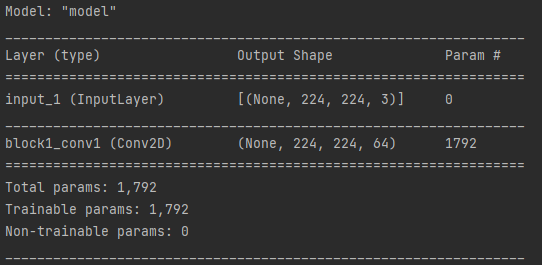
이 정보를 사용하여 전체 VGG16 모델에있는 레이어의 하위 집합 인 새 모델을 설계할 수 있다. 모델은 원래 모델과 동일한 입력 레이어를 갖지만 출력은 주어진 컨볼 루션 레이어의 출력이 될 것이다. 우리가 알고 있는 레이어 또는 기능 맵의 활성화이다.
예를 들어 VGG 모델을로드 한 후 다음과 같이 첫 번째 킨볼 루션 레이어 (인덱스 1)에서 피쳐 맵을 출력하는 새 모델을 정의할 수 있다.
# redefine model to output right after the first hidden layer
model = Model(inputs=model.inputs, outputs=model.layers[1].output)
사진은 직접찍은 도넛을 사용하기로 했다.
사진을 다운로드하고 파일 이름을 ' donut.jpg '로 현재 작업 디렉토리에 배치한다.
이 모델을 사용하여 예측하면 제공된 입력 이미지에 대한 첫 번째 컨벌루션 계층에 대한 특성 맵이 제공되며, 이것을 구현한다. 모델을 정의한 후 모델에서 예상하는 크기 (이 경우 224 × 224)로 새 이미지를 로드해야 한다.
# load the image with the required shape
img = load_img('donut.jpg', target_size=(224, 224))
다음으로 이미지 PIL 객체를 픽셀 데이터의 NumPy 배열로 변환하고 3D 배열에서 [ samples, rows, cols, channels ] 차원의 4D 배열로 확장해야 한다. 여기서 샘플은 하나뿐이다.
# convert the image to an array
img = img_to_array(img)
# expand dimensions so that it represents a single 'sample'
img = expand_dims(img, axis=0)
그런 다음 VGG 모델에 맞게 픽셀 값의 크기를 조정해야 한다.
# prepare the image (e.g. scale pixel values for the vgg)
img = preprocess_input(img)
이제 기능 맵을 가져올 준비가 되었다.model.predict () 함수 를 호출하고 준비된 단일 이미지를 전달하여 쉽게 수행할 수 있다.
# get feature map for first hidden layer
feature_maps = model.predict(img)
결과는 224x224x64의 기능 맵이 될 것이다. 64 개의 2차원 이미지를 모두 8x8 정사각형 이미지로 플로팅 할 수 있다.
square = 4
ix = 1
for _ in range(square):
	for _ in range(square):
		# specify subplot and turn of axis
		ax = pyplot.subplot(square, square, ix)
		ax.set_xticks([])
		ax.set_yticks([])
		# plot filter channel in grayscale
		pyplot.imshow(feature_maps[0, :, :, ix-1], cmap='gray')
		ix += 1
# show the figure
pyplot.show()
이 모든 것을 하나로 묶어 새 입력 이미지에 대한 VGG16 모델의 첫 번째 킨볼 루션 레이어에 대한 기능 맵을 시각화하는 전체 코드 예제가 아래에 나열되어 있다.
전체 코드
# summarize feature map size for each conv layer
# plot feature map of first conv layer for given image
from tensorflow.keras.applications.vgg16 import VGG16
from tensorflow.keras.applications.vgg16 import preprocess_input
from tensorflow.keras.preprocessing.image import load_img
from tensorflow.keras.preprocessing.image import img_to_array
from tensorflow.keras.models import Model
from matplotlib import pyplot
from numpy import expand_dims
# load the model
model = VGG16()
# redefine model to output right after the first hidden layer
model = Model(inputs=model.inputs, outputs=model.layers[1].output)
model.summary()
# load the image with the required shape
img = load_img('donut.jpg', target_size=(224, 224))
# convert the image to an array
img = img_to_array(img)
# expand dimensions so that it represents a single 'sample'
img = expand_dims(img, axis=0)
# prepare the image (e.g. scale pixel values for the vgg)
img = preprocess_input(img)
# get feature map for first hidden layer
feature_maps = model.predict(img)
# plot all 64 maps in an 8x8 squares
square = 4
ix = 1
for _ in range(square):
	for _ in range(square):
		# specify subplot and turn of axis
		ax = pyplot.subplot(square, square, ix)
		ax.set_xticks([])
		ax.set_yticks([])
		# plot filter channel in grayscale
		# pyplot.imshow(feature_maps[0, :, :, ix-1], cmap='gray')
		pyplot.imshow(feature_maps[0, :, :, ix])

		ix += 1
# show the figure
pyplot.show()
먼저 예제를 실행하면 이미지를 가져와 기능 맵을 출력하는 새롭고 작은 모델이 요약된다.
기억하세요 :이 모델은 VGG16 모델보다 훨씬 작지만 VGG16 모델과 같은 첫 번째 컨볼 루션 레이어에서 여전히 동일한 가중치 (필터)를 사용한다.

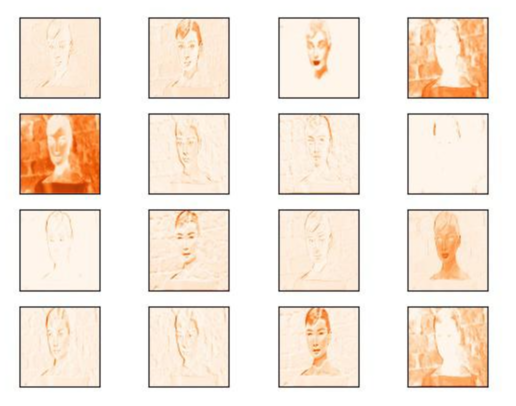
다음으로 64 개의 모든 피처 맵을 서브플롯으로 보여주는 그림이 생성된다.
첫 번째 컨벌루션 레이어에 필터를 적용한 결과는 여러 기능이 강조 표시된 새 이미지의 많은 버전임을 알 수 있다.
예를 들어, 일부 강 조선은 배경이나 전경에 초점을 맞춘다.


이것은 흥미로운 결과이며 일반적으로 우리의 기대와 일치한다. 다른 특정 컨벌루션 레이어의 출력에서 피쳐 맵을 플로팅 하도록 예제를 업데이트할 수 있다.
또 다른 접근 방식은 모델의 각 블록에서 출력된 기능 맵을 단일 패스로 수집 한 다음 각각의 이미지를 만드는 것이다.
이미지에는 풀링 레이어로 끝나는 5 개의 주요 블록 (예 : block 1, block 2 등)이 있습니다. 각 블록의 마지막 컨벌루션 레이어의 레이어 인덱스는 [2, 5, 9, 13, 17]이다. 여러 출력을 갖는 새 모델을 정의할 수 있다. 각 블록의 마지막 컨볼 루션 레이어 각각에 대해 하나의 기능 맵 출력이 있다.
예를 들면 :
# redefine model to output right after the first hidden layer
ixs = [2, 5, 9, 13, 17]
outputs = [model.layers[i+1].output for i in ixs]
model = Model(inputs=model.inputs, outputs=outputs)
model.summary()
이 새 모델로 예측하면 기능 맵 목록이 생성된다.
더 깊은 계층에 있는 기능 맵의 수 (예 : 깊이 또는 채널 수)는 64 개 (예 : 256 또는 512)보다 훨씬 많다는 것을 알고 있다. 그럼에도 불구하고 일관성을 위해 시각화되는 기능 맵의 수를 64 개로 제한할 수 있다.
# plot the output from each block
square = 4
for fmap in feature_maps:
	# plot all 64 maps in an 8x8 squares
	ix = 1
	for _ in range(square):
		for _ in range(square):
			# specify subplot and turn of axis
			ax = pyplot.subplot(square, square, ix)
			ax.set_xticks([])
			ax.set_yticks([])
			# plot filter channel in grayscale
			pyplot.imshow(fmap[0, :, :, ix-1], cmap='gray')
			ix += 1
	# show the figure
	pyplot.show()
이러한 변경 사항을 결합하여 이제 새 사진을 위해 VGG16 모델의 5 개 블록 각각에 대해 5 개의 개별 플롯을 만들 수 있다. 전체 목록은 아래에 제공된다.
전체코드
# visualize feature maps output from each block in the vgg model
from tensorflow.keras.applications.vgg16 import VGG16
from tensorflow.keras.applications.vgg16 import preprocess_input
from tensorflow.keras.preprocessing.image import load_img
from tensorflow.keras.preprocessing.image import img_to_array
from tensorflow.keras.models import Model
from matplotlib import pyplot
import matplotlib.pyplot as plt
from numpy import expand_dims
# load the model
model = VGG16()
# redefine model to output right after the first hidden layer
ixs = [2, 5, 9, 13, 17]
outputs = [model.layers[i].output for i in ixs]
model = Model(inputs=model.inputs, outputs=outputs)
# load the image with the required shape
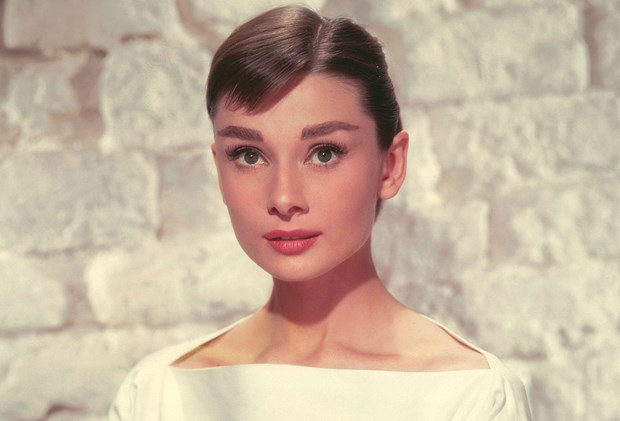
img = load_img('Hepburn.jpg', target_size=(224, 224))
# convert the image to an array
img = img_to_array(img)
# expand dimensions so that it represents a single 'sample'
img = expand_dims(img, axis=0)
# prepare the image (e.g. scale pixel values for the vgg)
img = preprocess_input(img)
# get feature map for first hidden layer
feature_maps = model.predict(img)
# plot the output from each block
square = 4
for fmap in feature_maps:
	# plot all 64 maps in an 8x8 squares
	ix = 1
	for _ in range(square):
		for _ in range(square):
			# specify subplot and turn of axis
			ax = pyplot.subplot(square, square, ix)
			ax.set_xticks([])
			ax.set_yticks([])
			# plot filter channel in grayscale
			pyplot.imshow(fmap[0, :, :, ix-1],cmap='gray')
			# pyplot.imshow(fmap[0, :, :, ix-1],cmap=plt.cm.Oranges)
			ix += 1
	# show the figure
	pyplot.show()


예제를 실행하면 VGG16 모델의 5 개 주요 블록의 기능 맵을 보여주는 5 개의 플롯이 생성된다.
모델의 입력에 더 가까운 기능 맵이 이미지의 많은 세부 사항을 캡처하고 모델에 더 깊이 들어가면 기능 맵이 점점 더 적은 세부 정보를 표시 함을 알 수 있다.
모델이 이미지의 특징을 분류에 사용할 수 있는 보다 일반적인 개념으로 추상화하기 때문에 이 패턴이 예상된다. 모델이 새를 본 것이 최종 이미지에서 명확하지 않지만 일반적으로 이러한 더 깊은 특징 맵을 해석하는 능력을 잃는다.


matplotlib color변경은 밑 사이트에서 알 수 있다.
matplotlib.org/stable/tutorials/colors/colormaps.html
Choosing Colormaps in Matplotlib — Matplotlib 3.4.1 documentation
Note Click here to download the full example code Choosing Colormaps in Matplotlib Matplotlib has a number of built-in colormaps accessible via matplotlib.cm.get_cmap. There are also external libraries like [palettable] and [colorcet] that have many extra
matplotlib.org
'Artificial intelligence, AI > TensorFlow' 카테고리의 다른 글
| [Deep learning]컨볼 루션 신경망에서 필터 및 기능 맵을 시각화하는 방법 -2- (0) | 2021.04.29 |
|---|---|
| [Deep learning]컨볼 루션 신경망에서 필터 및 기능 맵을 시각화하는 방법 -1- (0) | 2021.04.29 |
| [PYTHON] 감마를 이용하여 grayscale 이미지 밝기 조정 (0) | 2021.04.26 |
| [PYTHON] 컬러사진 흑백으로 만들기 -1- (0) | 2021.04.14 |
| [PYTHON] 파이썬 이미지 resize (0) | 2021.04.09 |


