
IT_World
[Kotlin][Android] 안드로이드 로그인/번호/비밀번호 숫자로 지정/글자 가운데 생성/버튼 클릭 만들기 본문
[Kotlin][Android] 안드로이드 로그인/번호/비밀번호 숫자로 지정/글자 가운데 생성/버튼 클릭 만들기
engine 2021. 7. 26. 11:55
로그인 / 회원가입 전화 걸기 버튼 XML 만들기
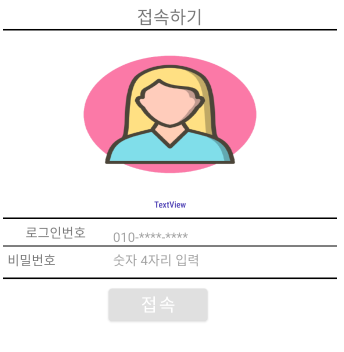
우선 로그인/회원가입에 필요한 간단한 XML을 만들었다.
메인 화면은 로그인/회원가입으로 들어가는 화면을 만들었다.
<?xml version="1.0" encoding="utf-8"?>
<androidx.constraintlayout.widget.ConstraintLayout xmlns:android="http://schemas.android.com/apk/res/android"
    xmlns:app="http://schemas.android.com/apk/res-auto"
    xmlns:tools="http://schemas.android.com/tools"
    android:layout_width="match_parent"
    android:layout_height="match_parent"
    tools:context=".LoginActivity">
    <ScrollView
        android:layout_width="match_parent"
        android:layout_height="match_parent">
    <TableLayout
        android:layout_width="match_parent"
        android:layout_height="wrap_content"
        android:layout_margin="16dp"
        app:layout_constraintLeft_toLeftOf="parent"
        app:layout_constraintRight_toRightOf="parent"
        app:layout_constraintTop_toTopOf="parent"
        android:stretchColumns="*"
        android:shrinkColumns="*">
        <TableRow>

            <TextView
                android:id="@+id/main_login"
                android:layout_width="wrap_content"
                android:layout_height="wrap_content"
                android:layout_gravity="center"
                android:layout_span="7"
                android:text="접속하기"
                android:textSize="20sp" />
        </TableRow>
        <View
            android:layout_width="wrap_content"
            android:layout_height="2dp"
            android:background="#000000"/>
        <ImageView
            android:id="@+id/image_login"
            android:layout_width="270dp"
            android:layout_height="150dp"
            android:layout_gravity="center"
            android:layout_marginStart="20dp"
            android:layout_marginTop="20dp"
            android:layout_marginEnd="20dp"
            android:contentDescription="@string/app_name"
            android:src="@drawable/girl" />

        <TextView
            android:id="@+id/textView"
            android:layout_width="0dp"
            android:layout_height="wrap_content"
            android:layout_marginTop="12dp"
            android:fontFamily="sans-serif-condensed-medium"
            android:gravity="center"
            android:padding="8dp"
            android:textColor="#4F42B5"
            android:textSize="10sp"
            app:layout_constraintEnd_toEndOf="parent"
            app:layout_constraintStart_toStartOf="parent"
            app:layout_constraintTop_toBottomOf="@+id/editText"
            tools:text="TextView" />

        <View
            android:layout_width="100dp"
            android:layout_height="2dp"
            android:background="#000000"/>
        <!-- ==================아이디입력=============================-->
        <RelativeLayout
            android:layout_width="wrap_content"
            android:layout_height="wrap_content">

            <TextView
                android:id="@+id/guardnum_login"
                android:layout_width="110dp"
                android:layout_height="wrap_content"
                android:layout_margin="5sp"
                android:gravity="center"
                android:text="로그인번호"
                android:textSize="15sp" />

            <EditText
                android:id="@+id/guardnum_login_edit"
                android:layout_width="match_parent"
                android:layout_height="wrap_content"
                android:layout_alignParentBottom="true"
                android:layout_margin="5sp"
                android:layout_span="6"
                android:hint="010-****-****"
                android:layout_toRightOf="@id/guardnum_login"
                android:inputType="number"
                android:textSize="15dp"
                android:background="@null"/>

        </RelativeLayout>
        <View
            android:layout_width="wrap_content"
            android:layout_height="1dp"
            android:background="#000000"/>
        <!-- ==================비밀 번호 4자리=============================-->
        <RelativeLayout
            android:layout_width="wrap_content"
            android:layout_height="wrap_content">

            <TextView
                android:id="@+id/guardpass_login"
                android:layout_width="110dp"
                android:layout_height="wrap_content"
                android:layout_margin="5sp"
                android:layout_span="1"
                android:text="비밀번호"
                android:inputType="number"
                android:textSize="15dp" />

            <EditText
                android:id="@+id/guardpass_login_edit"
                android:layout_width="wrap_content"
                android:layout_height="wrap_content"
                android:layout_margin="5sp"
                android:layout_span="6"
                android:hint="숫자 4자리 입력"
                android:layout_toRightOf="@id/guardpass_login"
                android:inputType="numberPassword"
                android:textSize="15dp"
                android:background="@null"/>

        </RelativeLayout>


        <View
            android:layout_width="wrap_content"
            android:layout_height="2dp"
            android:background="#000000"
            android:layout_marginTop="5dp"
            app:layout_constraintTop_toBottomOf="@+id/guardnum_login_edit" />

        <TableRow
            android:layout_width="wrap_content"
            android:layout_height="wrap_content">


            <Button
                android:id="@+id/button_login"
                android:layout_width="wrap_content"
                android:layout_height="wrap_content"
                android:gravity="center"
                android:layout_marginLeft="120dp"
                android:layout_marginTop="5dp"
                android:text="접속"
                android:textSize="20sp"
                app:layout_constraintTop_toBottomOf="@+id/button_main_login" />
        </TableRow>
    </TableLayout>
</ScrollView>
</androidx.constraintlayout.widget.ConstraintLayout>
android:gravity="center" 글자 가운데로 지정해 준다.
android:inputType="number" 숫자로만 입력할 수 있게 해 준다.
android:inputType="numberPassword" 비밀번호를 숫자로 입력할 수 있게 해준다.
<View
android:layout_width="wrap_content" -> 선 길이를 지정할 수 있다.
android:layout_height="1dp" ->선 크기를 설정할 수 있다. 숫자가 커질수록 선이 굵어진다.
android:background="#000000" -> 바탕화면 색 설정 가능하다.
view를 사용해서 중간에 선을 그려준다.
wrap_content : 포함된 내용을 보여줄 수 있는 크기로 설정
match_parent : 부모 뷰의 내부 여백(padding)을 제외한 크기로 설정 (가득 꽉 차게 설정)
fill_parent : match_parent와 동일
여기서 fill_parent는 비권장 속성이므로 fill_parent보다 match_parent를 사용하는 것을 추천한다.
다른 레이아웃 설정이 없을 때
wrap_content는 적당히 보일만한 크기 fill_parent는 match_parent 화면에 가득 찰만한 크기라고 보면 된다.
LoginActivity.kt 전체 코드
import android.content.Context
import android.content.DialogInterface
import android.content.Intent
import androidx.appcompat.app.AppCompatActivity
import android.os.Bundle
import android.text.InputFilter
import android.text.Spanned
import android.util.Log
import android.widget.EditText
import kotlinx.android.synthetic.main.activity_login.*
import androidx.appcompat.app.AlertDialog

import retrofit2.http.*
import java.util.regex.Matcher
import java.util.regex.Pattern
import java.util.regex.PatternSyntaxException

class LoginActivity : AppCompatActivity() {
    val TAG: String = "LoginActivity"

    override fun onCreate(savedInstanceState: Bundle?) {
        super.onCreate(savedInstanceState)
        setContentView(R.layout.activity_login)

// apply edit text decimal input filter
        guardnum_login_edit.inputFilterDecimal(
            maxDigitsIncludingPoint = 11,maxDecimalPlaces = 0)
        guardpass_login_edit.inputFilterDecimal(
            maxDigitsIncludingPoint = 4,maxDecimalPlaces = 0)

        textView.text = "로그인용 핸드폰번호는 '-' 제외 11자리 입력 바랍니다."
        textView.append("\n비밀번호 숫자 4자리 입력바랍니다.")
        // 로그인 버튼
        button_login.setOnClickListener {

            val intent = Intent(this, CheckActivity::class.java)
            startActivity(intent)
        }

    }

    // 로그인 성공/실패 시 다이얼로그를 띄워주는 메소드
    fun dialog(type: String){
        var dialog = AlertDialog.Builder(this)

        if(type.equals("success")){
            dialog.setTitle("로그인 성공")
            dialog.setMessage("로그인 성공!")
        }
        else if(type.equals("fail")){
            dialog.setTitle("로그인 실패")
            dialog.setMessage("아이디와 비밀번호를 확인해주세요")
        }

        var dialog_listener = object: DialogInterface.OnClickListener{
            override fun onClick(dialog: DialogInterface?, which: Int) {
                when(which){
                    DialogInterface.BUTTON_POSITIVE ->
                        Log.d(TAG, "")
                }
            }
        }

        dialog.setPositiveButton("확인",dialog_listener)
        dialog.show()
    }
){
    try {
        filters = arrayOf<InputFilter>(
            DecimalDigitsInputFilter(maxDigitsIncludingPoint, maxDecimalPlaces)
        )
    }catch (e: PatternSyntaxException){
        isEnabled = false
        hint = e.message
    }
}


// class to decimal digits input filter
class DecimalDigitsInputFilter(
    maxDigitsIncludingPoint: Int, maxDecimalPlaces: Int
) : InputFilter {
    private val pattern: Pattern = Pattern.compile(
        "[0-9]{0," + (maxDigitsIncludingPoint - 1) + "}+((\\.[0-9]{0,"
                + (maxDecimalPlaces - 1) + "})?)||(\\.)?"
    )

    override fun filter(
        p0: CharSequence?, p1: Int, p2: Int, p3: Spanned?, p4: Int, p5: Int
    ): CharSequence? {
        p3?.apply {
            val matcher: Matcher = pattern.matcher(p3)
            return if (!matcher.matches()) "" else null
        }
        return null
    }
}
}
maxDigitsIncludingPoint로 최대 자릿수 지정해준다.
maxDecimalPlaces는 소수점 최대 자릿수 지정이다.
textView.text = "로그인용 핸드폰 번호는 '-' 제외 11자리 입력 바랍니다." 제대로 입력을 안 했을 시 나오는 메시지
'Android > kotlin' 카테고리의 다른 글
| [Kotlin][Android] 안드로이드 회원가입/로그인/전화 바로걸기 버튼 클릭 만들기 (0) | 2021.07.22 |
|---|
